Monday, December 31, 2012

Cheers to the New Year!


Happy New Year's Eve! I can't believe how fast this year has gone! I have had so much fun paper crafting with all my friends - and I'm excited to start a new year with more cards ahead of me. Today I'm sharing one of my favorite cards made with the Happy Hour set. I thought this was an appropriate one to send out the year with some cheers! 

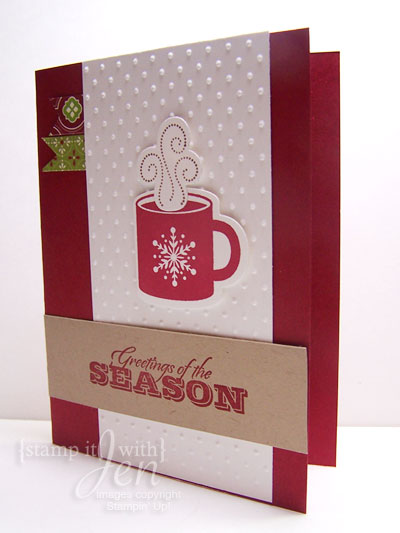
To make this card I cut out several of that fun shape using the Framelits die - Apothecary Accents - in the big shot. Then I stamped various drinks on three of them from the Happy Hour stamp set, with a "cheers"  on the fourth one.  Then I layered them over some real red card stock that has been embossed using the fancy fan embossing folder. I added some paper int he background and some grosgrain ribbon in different coordinating colors (I think this ribbon is retired but I still have some left and the colors still match!)


stamps: Happy Hour
ink: Real Red, Old Olive
paper:  Real Red, Whisper white, Retired Designer paper, old olive
Big Shot: Framelits Dies - Apothecary Accents,  Fancy Fans embossing folder
other: Ribbon Grosgrain in red, olive and white (retired)


Click here to order Stampin' Up Products Online from me!

Sunday, December 30, 2012

Christmas Mug


Need to use up all those little paper scraps you have left? Here's a great way to do it. Simply choose a neutral colored background for you card that goes with your scraps and then put a few strips across the card. Add on a pretty accent, such as the mug from the Scentsational season set and you have a fun modern card! This is a great way to use up little pieces and leftovers - I hardly every throw away any scraps since you can usually find a fun use for them!


stamps: Scensational Season, Teeny Tiny Wishes
ink: Cherry Cobbler, soft suede
paper:  Crumb Cake, Early Espresso, Whisper white, Festival of Prints designer paper stack scraps
Big Shot: Framelits Dies - Holiday Collection
other: Adhesive pearl, Scallop circle punch, circle punch


Click here to order Stampin' Up Products Online from me!

Saturday, December 29, 2012

Peace on Earth Birdcage


I really love this bird cage set, Aviary, but haven't used it much so I wanted to try to make a couple holiday cards with it. I posted one a couple of days ago here, and this is the second one I made. This card uses the bird and cage from the Aviary set along with the holly from the Happy Hour Set.  Then I added on some ribbon (this is retired, I think its from Sale-a-Bration last year). The shape is cut out using the Framelits die (window frames). I also used the early espresso Core'dinations cardstock and the woodgrain embossing folder to create the cool wood texture. This cardstock is cool because the core of it is a lighter color so when you emboss or sand it, you can see the color through it!  The paper is a piece of retired holiday paper from my stash! 


stamps: Happy Hour, Aviary, Greetings of the Season
ink: Real Red, Early Espresso, Old Olive
paper:  Real Red, Early Espresso Core'dinations cardstock, Whisper white, Retired Designer paper
Big Shot: Framelits Dies - Window Frames, Woodgrain embossing folder
other: Ribbon (retired)


Click here to order Stampin' Up Products Online from me!

Friday, December 28, 2012

Christmas Card Cocktail


Here is the second Christmas Card I designed and sent out to bunches of people! This one uses the Happy Hour stamp set along with the Bigz Snow Flurry die in the Big Shot. I love this cute little Martini glass with the candy cane in it... I also added some pearls for bubbles!


stamps: Happy Hour
ink: Cherry Cobbler, Gumball Green
paper:  Whisper white, Cherry Cobbler, Gumball Green, early espresso, Be of Good Cheer Designer Paper
Big Shot: Snow Flurries Bigz Die, Chevron Embossing Folder
other: Large circle punch, adhesive pearls, 


Click here to order Stampin' Up Products Online from me!

Thursday, December 27, 2012

Birds for the Holidays

I hope everyone had a wonderful Christmas! I still have a few holiday cards to share.. Today I amd sharing a card I made using the set Aviary. This is not a holiday set but I made it holiday by making the birds holiday colors, old olive and real red. I added a red bow to the top of the birdcage and used some retired holiday paper to complete the card.

Stamps: Greetings of the Season, Aviary
Paper: real red, early espresso, whisper white,
Ink: real red, early espresso, old olive, retired designer paper
Other: red grosgrain ribbon

Click here to order Stampin' Up Products Online from me!


Tuesday, December 25, 2012

Merry Christmas!

Hope everyone is having a good Christmas and spending time with their families. Today I am sharing one of the cards I sent out for my Christmas cards this year. I always let my husband give a little feedback on what stamp he likes and this year he liked the little mug so I designed a simple card using the mug for our cards. The hardest part was cutting out all the little mugs with the framelits die... Ok, not really hard but a bit tedious since you can only cut out one at a time.... I think I made 30 of this card! I will share my other holiday cards soon.
Stamps: Greetings of the Season, Scentsational Season
Paper: cherry cobbler, whisper white, crumb cake,
Ink: cherry cobbler, crumb cake, be of good cheer designer paper
Big shot: perfect polka dots embossing folder, framelits dies holiday collection

Click here to order Stampin' Up Products Online from me!


Monday, December 24, 2012

Happy holidays mug card

I have been bad at keeping up with my blog lately- I have been super busy with Christmas projects and then came down with a horrible cold and have been sick this whole week! I do have a Bunch of holiday cards to share that I haven't had a chance to yet so I apologize for it being late in the holiday season but I will be sharing them over the next week or so as I get caught up.
The card I am sharing today was made using the scentsational season stamp set and coordinating framelits die to create this cute little mug. The background was created using the perfect polka dots embossing folder in the big shot. I added little patterned paper flags using the scraps I had from the Festival of prints designer paper stack. Then I added the sentiment "greetings of the season" from the greetings of the season stamp set.
Stamps: Greetings of the Season, Scentsational Season
Paper: cherry cobbler, whisper white, crumb cake, festival of prints designer paper stack
Ink: cherry cobbler, crumb cake
Big shot: perfect polka dots embossing folder, framelits dies holiday collection


Wednesday, December 12, 2012

Hand Sanitizer holder


Isn't this the cutest little gift? I love how these little guys turned out. They fit a mini hand sanitizer from Bath and Body works! To make these I used the Cannery die set to make the Jar fronts. The jar shape isn't quite large enough so you need to fold your paper so it doesn't cut off the bottom part and then unfold and use a corner rounder on the bottom two corners. I used an oval punch to cut out the center so you can see the scent of the sanitizer that is inside on the front but on the back I left it whole. Then you make a little box out of card stock to hold it all together. Add some jar tops, cut out with the cannery dies and some bakers twine to make it extra cute! This is one of the projects options to make for my holiday gift class this year.  I also made a bunch of these little cuties in different papers for the craft fairs I did this year! They were a hit!


paper:  Festival of Prints designer paper pack, cherry cobbler, lucky limeade
big shot: Cannery Framelits Dies
other: bakers twine, Simply Scored plate, sticky strip, Corner rounder, Oval punch


Click here to order Stampin' Up Products Online from me!

Monday, December 10, 2012

Notebook Gift


Here is another cute and easy gift idea for the holidays. This notebook holder fits a junior legal pad (they're like 5 x 7) and is made from a sheet of 12x12 paper. You fold and score the paper to fit around the legal pad and pen and then decorate the cover however you like. I wanted to use the  pretty papers from the festival of prints designer paper pack, but they are a little bit shorter than the front so I framed it with a coordinating cardstock layer and added some ribbon to dress it up. Then I cut out the cool label shape from the apothecary accents die set with the big shot and stamped the sentiment "you are simply wonderful" onto it. This I added on with some bakers twine. For a finishing touch I added paper inside the pen. You just  need a little strip and then you take apart the pen and wrap it around the ink shaft and then put it back together. The RSVP pens work best for this. 

I forgot to take a photo of the inside but I also covered the top of the legal pad that is above where you tear off the pages with designer paper so it's pretty on the inside too!

stamps: friendly phrases
ink: early espresso
paper:  Whisper white, Early Espresso, Crumb Cake, Festival of Prints designer paper pack 
big shot: Apothecary Accents Framelits Dies
other: bakers twine, Simply Scored plate, seam binding ribbon, junior sized legal pad, sticky strip, RSVP pen


Click here to order Stampin' Up Products Online from me!

Saturday, December 8, 2012

Snowman Soup!


Here's another variation of Snowman soup - this is always a fun project to make around the holidays and is great for anyone on your list that you just want to give a little something fun! In the past I have made snowman soup in a mug  but this time I wanted to make the container look like snowman. I used the Fancy Favor die to cut out a box with white card stock. Then I cut just the front piece again in black to make the hat. I used another piece for the hat brim, just a strip of black. Then I punched a couple of small circles for the eyes and a triangle (cut off one point of a star punched out of orange). to make the cheeks pink I used some chalk.

To dress him up a bit, I used some ribbon and a flower on his hat!  I punched a hole on each side of the bag and used ribbon for a handle. 

Inside there is a hot cocoa packet, some hershey kisses and a candy cane. You can also add marshmallows if you'd like but I didn't this time…

paper:  black, white, pumpkin pie, real red
big shot: Fancy Favor Die
other: Stitched grosgrain ribbon, small circle punch, star punch, flower punch, self adhesive pearl, polka dotted scalloped ribbon


Click here to order Stampin' Up Products Online from me!

Friday, December 7, 2012

Coaster Sized Calendar


These coaster sized Calendars are great for anyones desk! To make these I covered a 4 inch cardboard coaster with designer paper on both sides. Then I simply added a little mini calendar (purchased) with a coordinating border piece behind it. To add a little more fun to this project, I purchased some binder clips and covered them with coordinating paper and added a ribbon! This is an easy and very fun project! I made a bunch of these for my local craft fair booth this year.


Click here to order Stampin' Up Products Online from me!

Thursday, December 6, 2012

Hershey Nugget Gift


Here is one of the projects available to make at my Holiday Gift Class! Everyone loves chocolate which makes these the perfect little gifts. To make these  made a little tray out of gumball green card stock and stamped trees on it. You don't see them very well in the picture but you can see them on the backside of the tray. then I wrapped the Hershey nuggets using different papers from the Be of Good Cheer Designer Series paper pack and put it all in a cute little cello bag (this is a pretzel sized bag from the candy section of the local craft store).  

The sentiment Merry Christmas is from the teeny tiny wishes stamp set and is punched out with the oval punch and layered over a cherry cobbler scalloped oval. 
Then just add some ribbon for the finishing touch. 


stamps: Chock full of cheer, Teeny Tiny Wishes
ink: Gumball Green, Cherry Cobbler
paper:  Whisper white, Cherry Cobbler, Gumball Green, Be of Good Cheer Designer Series paper pack
other: bakers twine, oval punch, scallop oval punch, Stitched Satin ribbon in Gumball green, pretzel bag from craft store, Hershey Nuggets


Click here to order Stampin' Up Products Online from me!

LinkWithin

Related Posts with Thumbnails