Wednesday, February 29, 2012

Faux Tile Easel Card

Here is one more faux tile card. This one, like the one posted here, uses the Fresh Vintage stamp set. (this is one of the sets you can get for FREE during Sale-a-Bration). This time I made the card into an easel card. If you like the easel card Idea, I will be showing an easel card at my next class (the fun folds class) so make sure to sign up for that. It's not this exact card but it is the same idea!

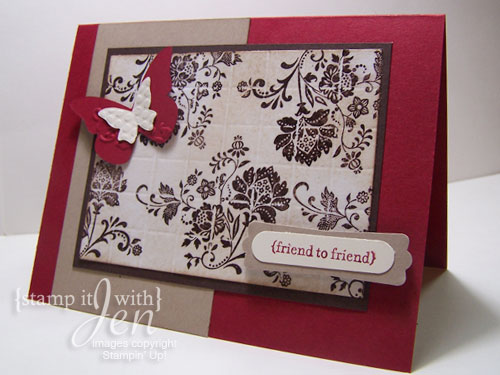
To make this card I used the framed tulips embossing folder and put the faux tile piece inside it. I added on some pleated satin ribbon and the sentiment thanks to the front.

Here is what the card looks like closed:

stamps: Fresh Vintage, Kindness Matters
ink: early espresso, baja breeze
paper: early espresso, whisper white, crumb cake
others: pleated satin ribbon, oval punches, scallop oval punch

Tuesday, February 28, 2012

Faux Tile - Open Sea

Can you tell I have been having fun with the Faux Tile technique? Here is another card I made using the tile technique. This one is more masculine - I used the stamp set Open Sea , which isn't in the catalog. This set was in the summer mini book but has been continued on and you can still order it! It makes great guy cards!

I stamped the images with soft suede and pool party ink and coordinated the paper to match. Then added some bakers twine in early espresso and textured the paper with the square lattice embossing folder. The Sentiment Happy Birthday is from the set teeny tiny wishes.

stamps: Open sea, teeny tiny wishes
ink: pool party, soft suede
paper: soft suede, early espresso, whisper white, pool party
other: Scallop ribbon border punch, square lattice embossing folder, big shot, embossing powder, simply scored tool

Monday, February 27, 2012

More Faux Tile Cards

Here are a couple more faux tile cards! For this cards I used the large cherry stamp from the stamp set Mouthwatering in the occasions mini For both of these cards I used the same tile technique as the card I posted a couple of days ago here. On these cherry cards I used the clear cherry scented embossing powder from the occasions mini so they smell like cherries too!

Here is a close-up of the large cherry:


I also made a card using the same idea and color palette but this time I use the small cherry stamp from the stamp set Fruit and Flowers which is in the big idea book and catalog.

Here is a close-up of the technique:


stamps: Mouthwatering, Fruit & Flowers, Fabulous Phrases, Happiest Birthday wishes
ink: Real red, old olive, early espresso
paper:Real red, old olive, early espresso, whisper white
other: lucky limeade ruffled ribbon, perfect polka dots embossing folder, scallop ribbon border punch, scallop trim border punch


Saturday, February 25, 2012

Polished stone


Here is a the other card we made at my technique class last Thursday. This card uses a technique called "polished stone" to make that fun marbled looking background image behind the bird. The bird is from the stamp set Nature walk. To make the rest of the card I framed the image with some white card stock and added some black satin ribbon. I love how striking this color combo is! The I used the flower image from the same set to stamp a tone on tone image with tempting turquoise card stock and ink. I also used the scallop trim border punch to accent the center piece. Lastly, I added on some adhesive pearls to finish it off with an elegant touch. I love how this card turned out.

Here is a close up so you can see the technique. It's hard to tell in the image. It it also has a little sparkle to it.

Click here to order Stampin' Up Products Online from me!


Thursday, February 23, 2012

Technique - Faux Tile

Here is a card we made at my technique class tonight. The Technique is called Faux Tile. You score the cardstock using the Simply Scored Tool and then stamp and sponge and emboss with clear embossing powder. The effect looks like tiles and is super cool!

For this card I used the stamp set Fresh Vintage, which you can only get during the Sale-a-Bration. Simply spend $5o and you can order this set for FREE!! Contact me if you are interested in learning more!

stamps: Fresh Vintage, Teeny Tiny Wishes
ink: early Espresso, Cherry Cobbler
paper: early Espresso, Cherry Cobbler, crumb cake, whisper white
other: Simply Scored Tool, Clear Embossing powder, sponge, word window punch, modern label punch, Beautiful Wings Embosslit, Big Shot


Saturday, February 18, 2012

Ribbon storage that rocks!


I'm excited to share this great idea with you today. I've been trying to get my craft area more organized lately and I stumbled across this great idea from Amazing Paper Grace. You can see her post here. I thought... wow, I could do that too! I admit it, I'm a ribbon addict. Not only do I have a shelf full of Stampin' Up ribbons but I also had tons of other spools of ribbons hanging out in various places in my craft room, in boxes, loose on shelves etc.... So I emptied out one of the drawers in my organizer that sits next to where I work and went to town. Luckily I always save the cardboard backer sheets that come with all the Stampin' Up paper packs so I had a bunch of those. I cut them down to 3 inch by 3 inch squares so the ribobns would fit in this drawer and started winding!

Here's how it turned out:

Isn't it lovely? I think I will use it now that it's all pretty, organized and easy to access! PLUS- the amount of space I'm saving it amazing. I had a giant box of cardboard ribbon spools I recycled! previously each of the little cubbies in this drawer would only hold 4 or so spools. Now, as you can see they fit a dozen or so ribbons!


Friday, February 17, 2012

Technique - Polished Stone


I am so in
love with this card! I'm so happy with how it turned out. This is a technique we will be doing next week in my technique class called Polished Stone! If you'd like to sign up, let me know by the end of the day Friday (feb. 17). This technique took a little bit of experimenting and but I think I have it down now! I will be giving tips to those of you who come next week. It's hard to see well in the pic but it really sparkles too!

To make this card after I did the fun background piece, I stamped the bird from the Nature Walk stamp set on it with Staz-On ink. I framed it with some white to really make it pop off. Then I paired it with some tempting turquoise cardstock, which I stamped flowers on with the same color ink. I added the black satin ribbon and border punched cardstock which gives it a really striking look! The base of the card is old olive.


Thursday, February 16, 2012

Love Card

Here is another card I made using the negative space the punch makes! I'm loving how fun these are! For this one I punched the heart out and used a white gel pen to make fake stitching marks around it. Then I put a white heart behind it that I stamped the word love on and added a button and two pearls to the heart. The embossed piece i found in my scrap drawer, rejected from an older project (gotta love that) but it was embossing using the vintage wallpaper embossing folder and sponged lightly with white ink. Then I added on a border punch (just a plain scallop) and some early espresso bakers twine!

I think this would make a great valentine but would also work for a wedding or anniversary card!

stamps: fabulous phrases
ink:pretty in pink, white
paper: crumb cake, whisper white, pretty in pink, rose red
other: large heart punch, adhesive pearls, white gel pen, vintage wallpaper embossing folder, scallop border punch, early espresso bakers twine

Monday, February 13, 2012

Heartfelt Valentine


Hello and Happy Valentine's Day! If you're wondering why I haven't posted in awhile here's the scoop - I've had some difficulties with my computer - hard drive crashed and we had to take it apart and put in a new one! Since I have an imac this was no easy feat! But thank goodness I had a back up drive so didn't loose much... just tons of time re-building and re-installing everything. Anyways, I'm getting back in the swing of things in time to share this valentine with you!

I have seen a couple cards like this online -- can't remember where but I loved the idea of using the negative shape the punch makes and filling to to make a pretty card! I used strips of ribbon out of my stash (wow.. have a ribbon story to share later this week), so it's not SU but you could do the same thing with SU ribbons too! I stamped the word "heartfelt" from the set fabulous phrases in the corner and added some dimensionals to make it pop off. This is a really simple card but I love how it looks! Sometimes I have to tell myself to keep it simple.

Close up:
hint: if you want to make sure your shape is centered on the cardstock square, just draw an x in the middle of your square before you punch it and then center the x in the the middle of the punch... tah dah!

stamps: fabulous phrases
ink: real red
paper:whisper white, crumb cake, real red
other: Ribbons (not SU), Large Heart Punch, dimensionals

Wednesday, February 1, 2012

Easy Valentine!

Here is a quick and easy valentine you can make for everyone! I love the color combo on this card-- Cherry Cobbler, Chocolate chip and pretty in pink! It's so simple to make- I just created the background texture using the houndstooth embossing folder on the chocolate chip cardstock, then I punched out 3 squares with the postage stamp punch. The hearts were cut out with the new fashionable hearts emboslits die. This little bitty die embosses AND cuts at the same time.. makes 5 different tiny hearts with each pass! I have a tip about these little dies... I keep all my extra hearts in a little container... sometimes you might just need one pink one like I used on this card but now I have 4 other pink ones ready the next time I need a heart!


I also used some cherry cobbler bakers twine and stamped the message Happy Valentines Day from the stamp set teeny tiny wishes and punched it out with the word window punch!

LinkWithin

Related Posts with Thumbnails